Time to set up Workzone for Bitbucket!
Below is a simple step-by-step tutorial on basic settings configurations to help get you and your team started. Once a basic setup has been implemented, we encourage you to read through all Workzone Features pages to assist with adding further complexity.
Create a Workzone Account User #
Before you get started, it is important to set up a Workzone specific Account User, this will be needed as you work through the steps below.
Why do I need to create a Workzone Account user? When Bitbucket apps such as Workzone carry out actions such as merging pull requests automatically, the automerge user (Workzone Account user) will be the initiator of these actions. It is best practice to use Bitbucket branch permissions to limit write access to the pull request target branches like ‘master’ or ‘develop’ to ensure ‘normal’ users can’t simply press the ‘Merge’ button.
You can also use an existing user with repository write privileges to act on Workzone’s behalf, although we recommend creating a new Workzone Account user.
Note: These steps only need to be performed once at the initial setup. Other repositories can re-use the Workzone account user.
Setting up the Workzone account user

- Create an additional Workzone account email within your organization
- (e.g. [email protected]) as seen in the screenshot example above. Important: Do not copy the exact email/example above – You need to use your own company domain.
- Using the new Workzone account email, create a new user in your workspace and assign admin permissions.
Create Groups #
To get full use of the Workzone functionality, it is best to have groups of specific users set up within your space. For most, this should already be in action. If you do not already have groups set up, please follow the steps below.
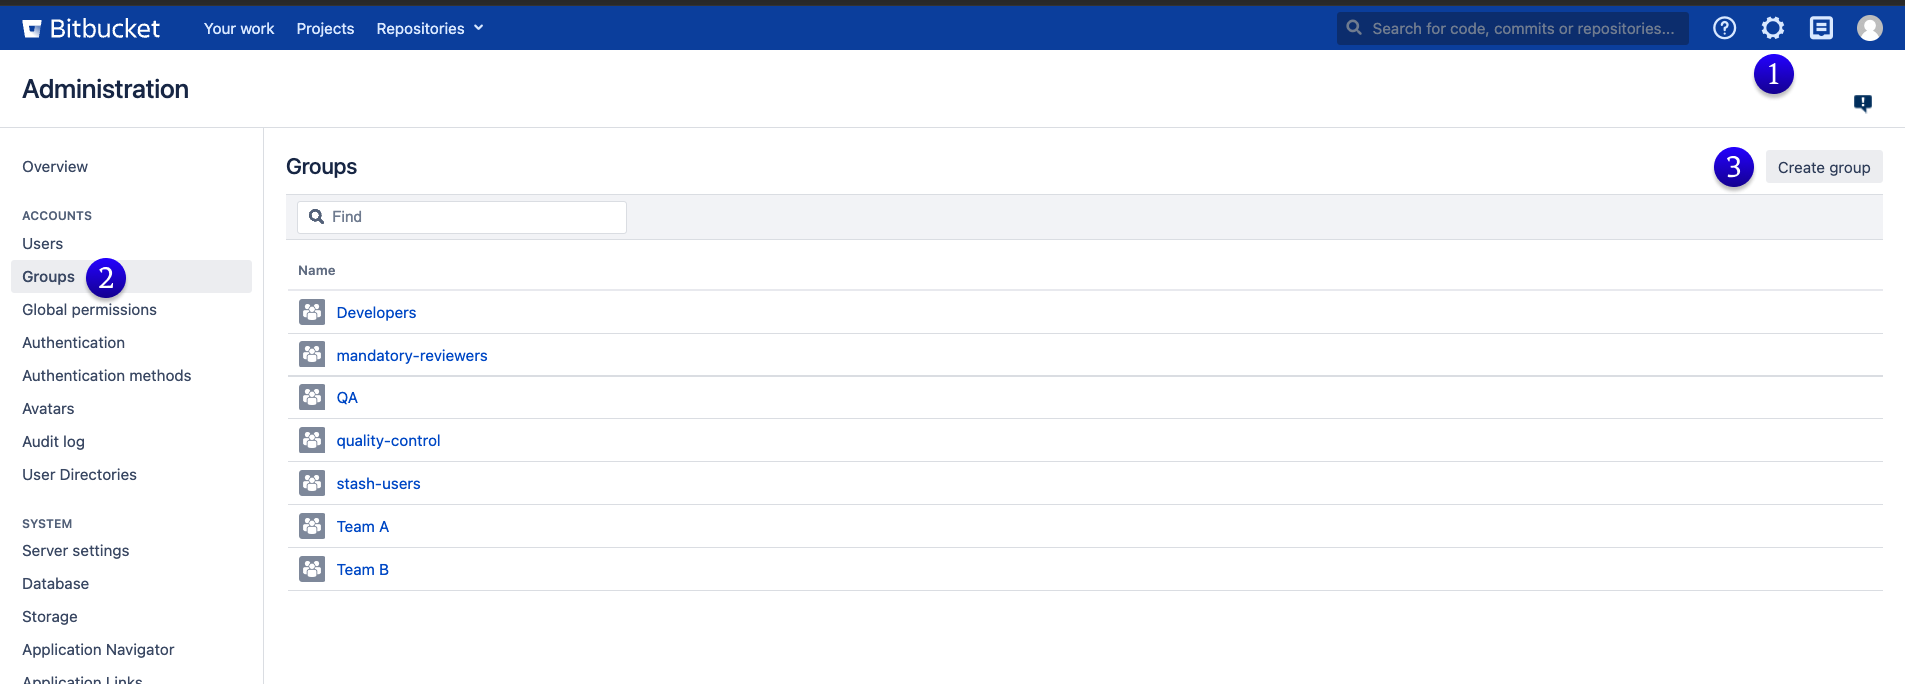
- Navigate to your Administration Settings.
- Click the Users tab
- Click “Create Group”
- Name the group & add the relevant team members.
Setting Up Bitbucket Stock Settings #
For Workzone to function correctly, various stock Bitbucket settings must be altered.
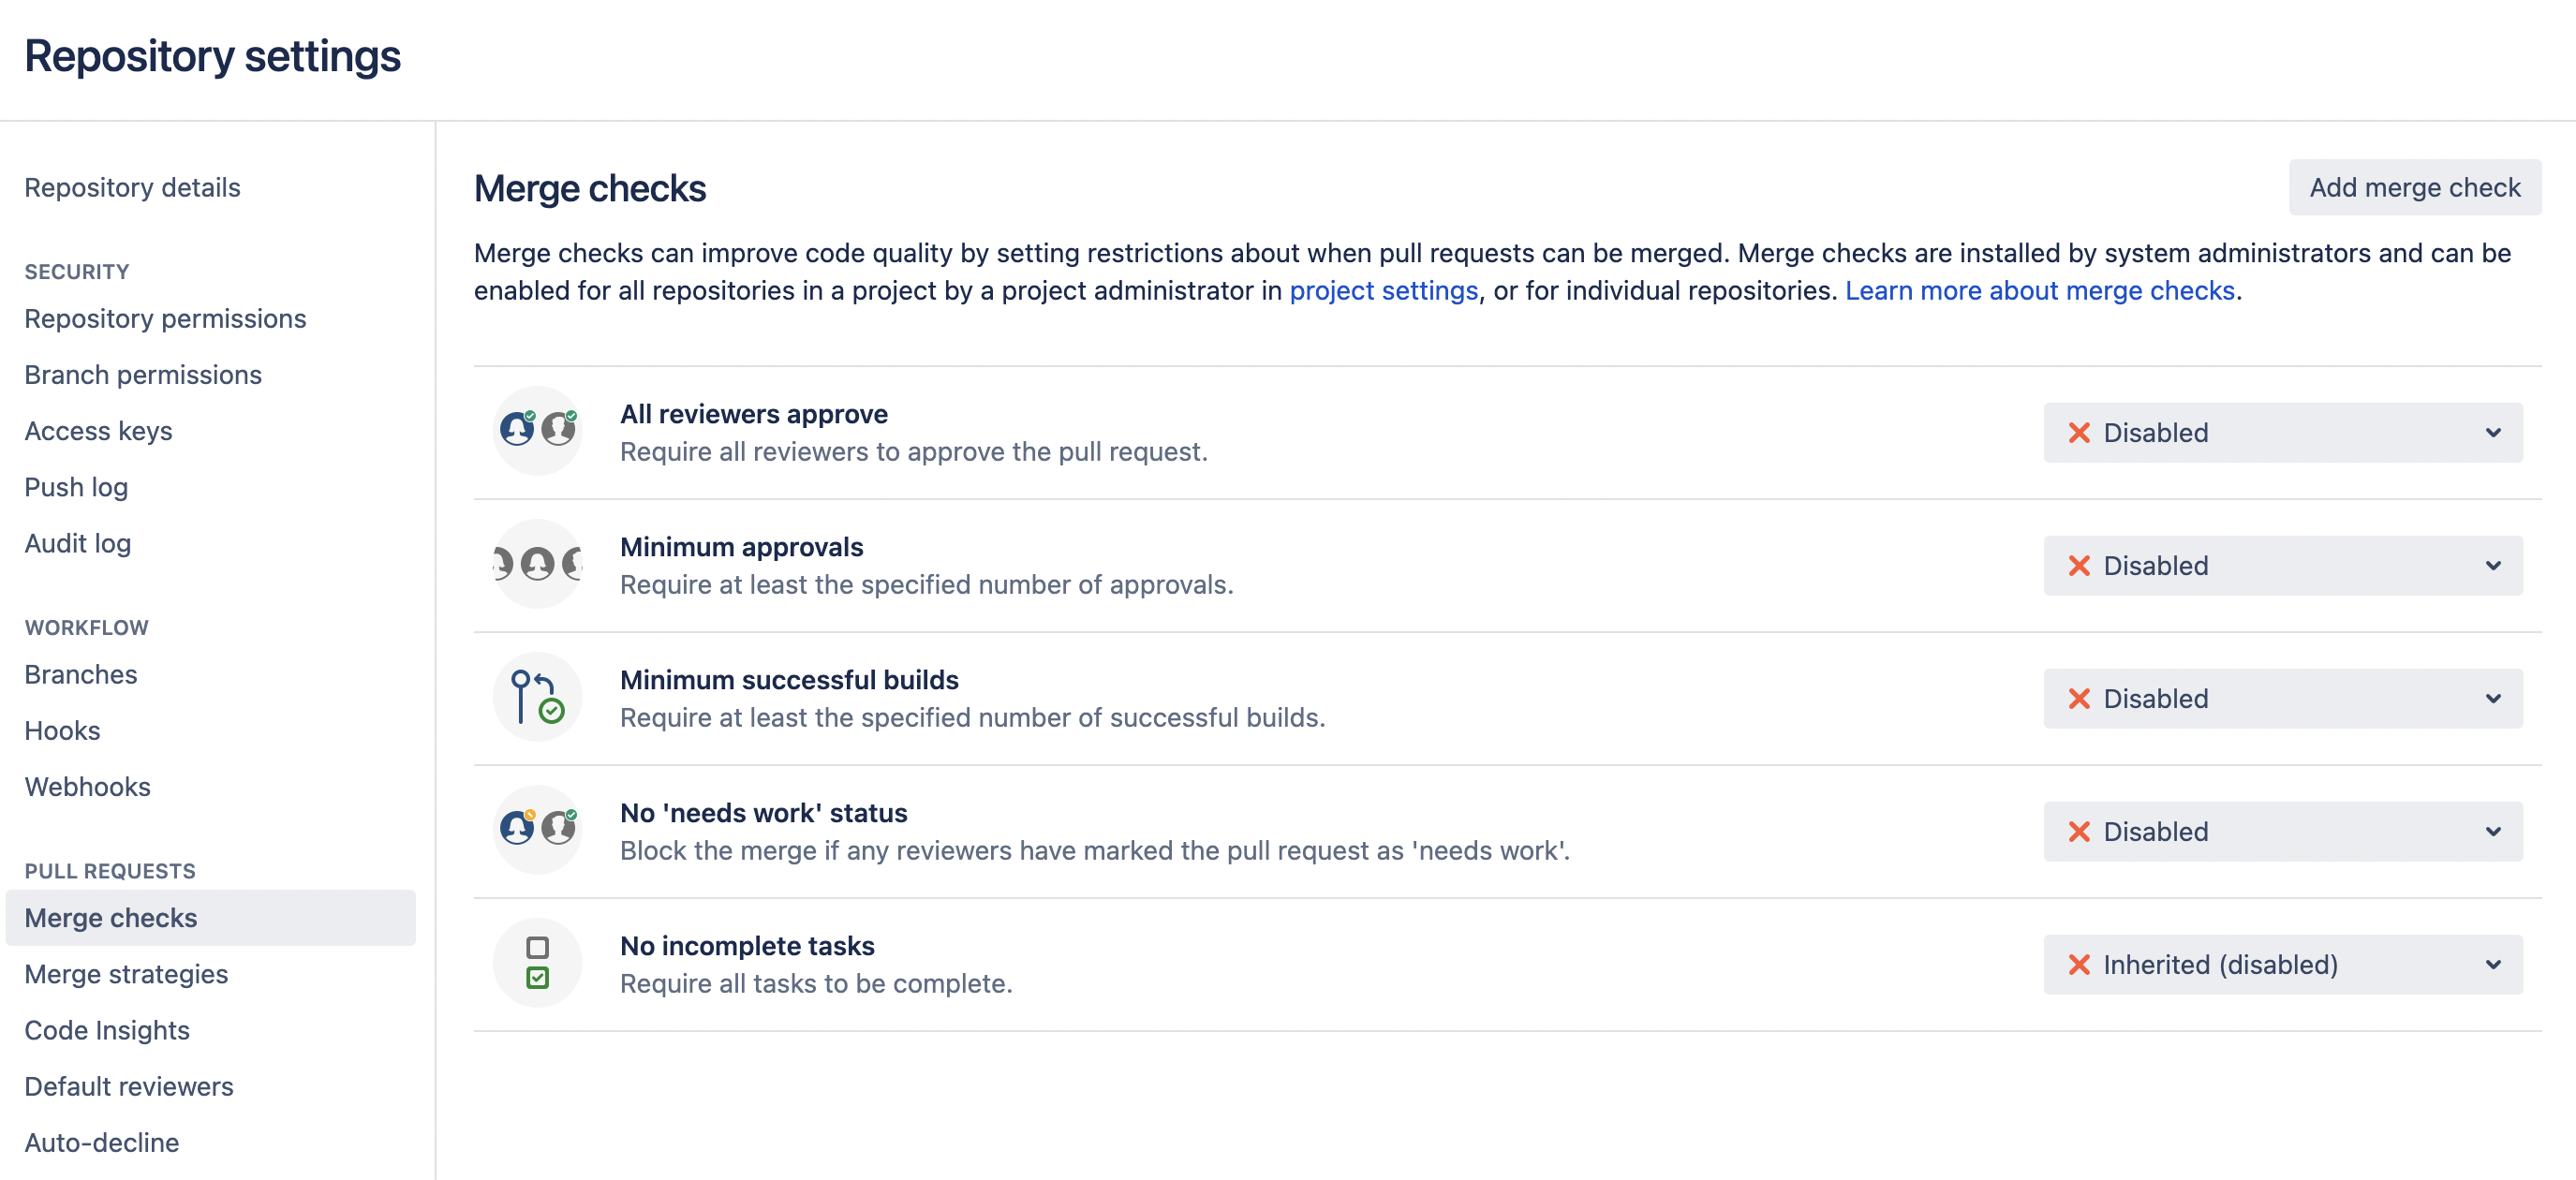
We recommend mirroring the above Merge Checks settings for all options – These merge check features are now covered through Workzone, where more refined functionality is found.
- All reviewers approve – Disabled
- Minimum approves – Disabled
- Minimum successful builds – Disabled
- No ‘needs work’ status – Disabled
- No incomplete tasks – N/A – There is no double-up with Workzone, this can be used at your own discretion.
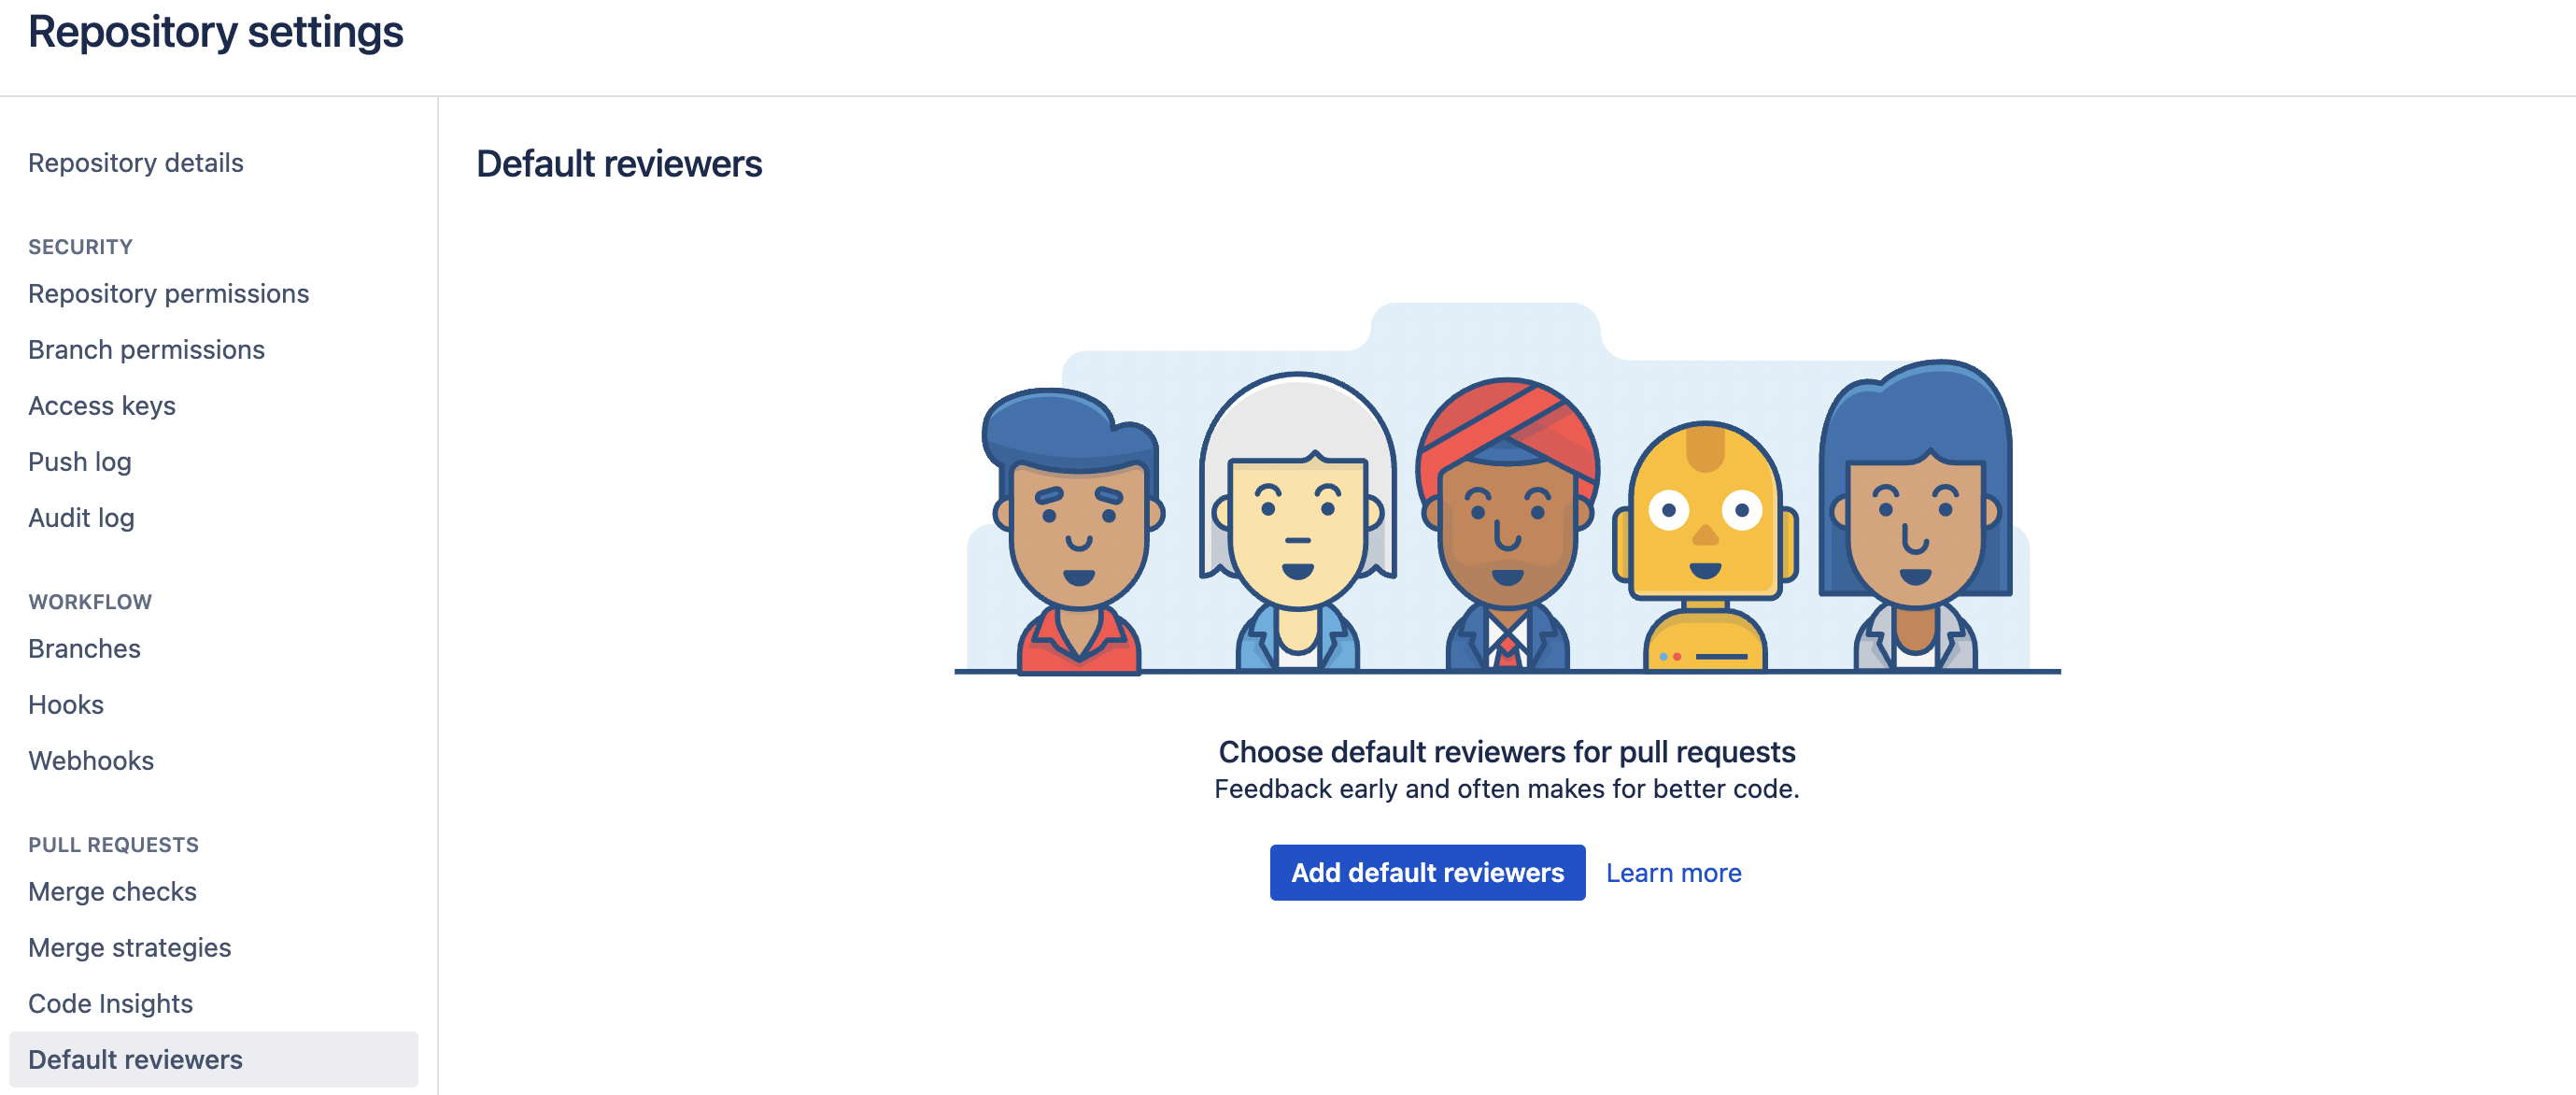
Default Reviewers
It is possible to have both Workzone reviewers and Bitbucket reviewers actively running at the same time, and this may be of interest depending on how you want to use Bitbucket and Workzone together. However, we recommend turning off all default reviewers within the Bitbucket stock settings – All Pull Request Reviewers settings configurations are now handled within the Workzone settings, in far greater detail.
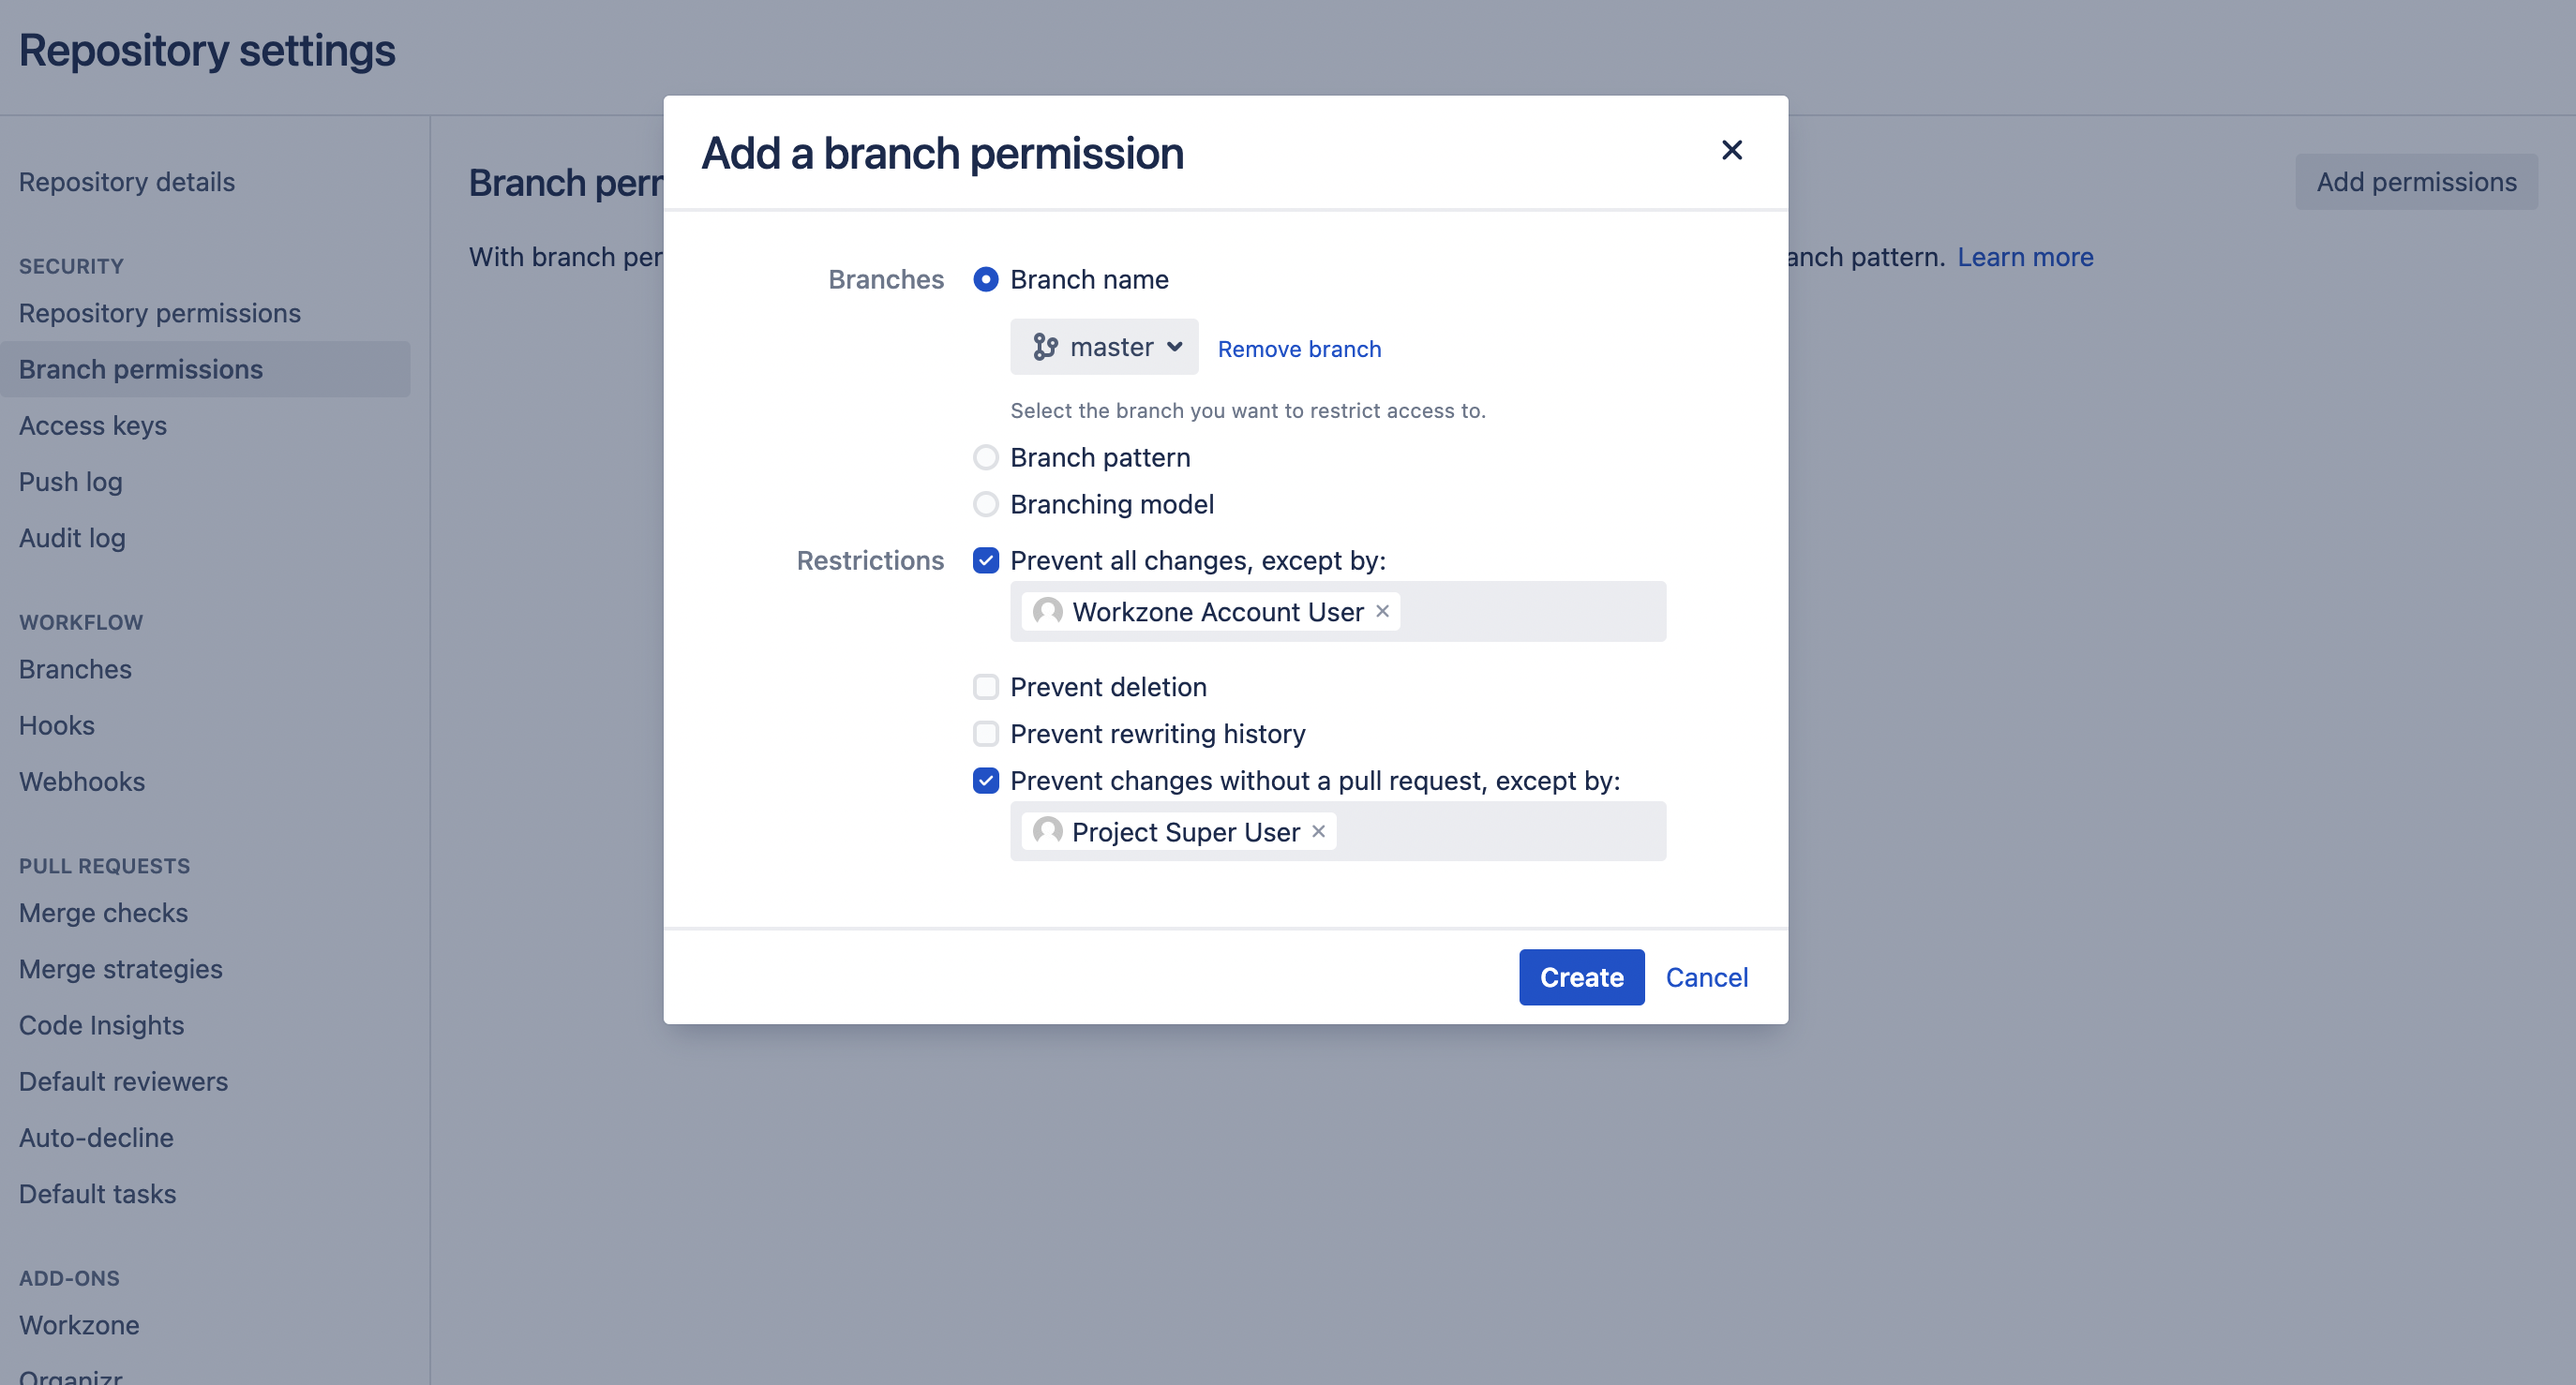
Branch Permission
It is best practice to use Bitbucket branch permissions to limit write access to the pull request target branches like ‘master’ or ‘develop’ to ensure ‘normal’ users can’t simply press the ‘Merge’ button. To ensure the new Workzone Account user created will automatically merge pull requests without any issues, this is where we enable a branch permission as seen in the above screenshot.
Superuser – (example) optionally you can define a user that is authorised to bypass required merge checks and merge the pull request at any stage.
Hooks
Bitbuckets stock Hooks configurations do not conflict with the Workzone settings or functionally and can be used at your own discretion.
Setting Up Workzone #
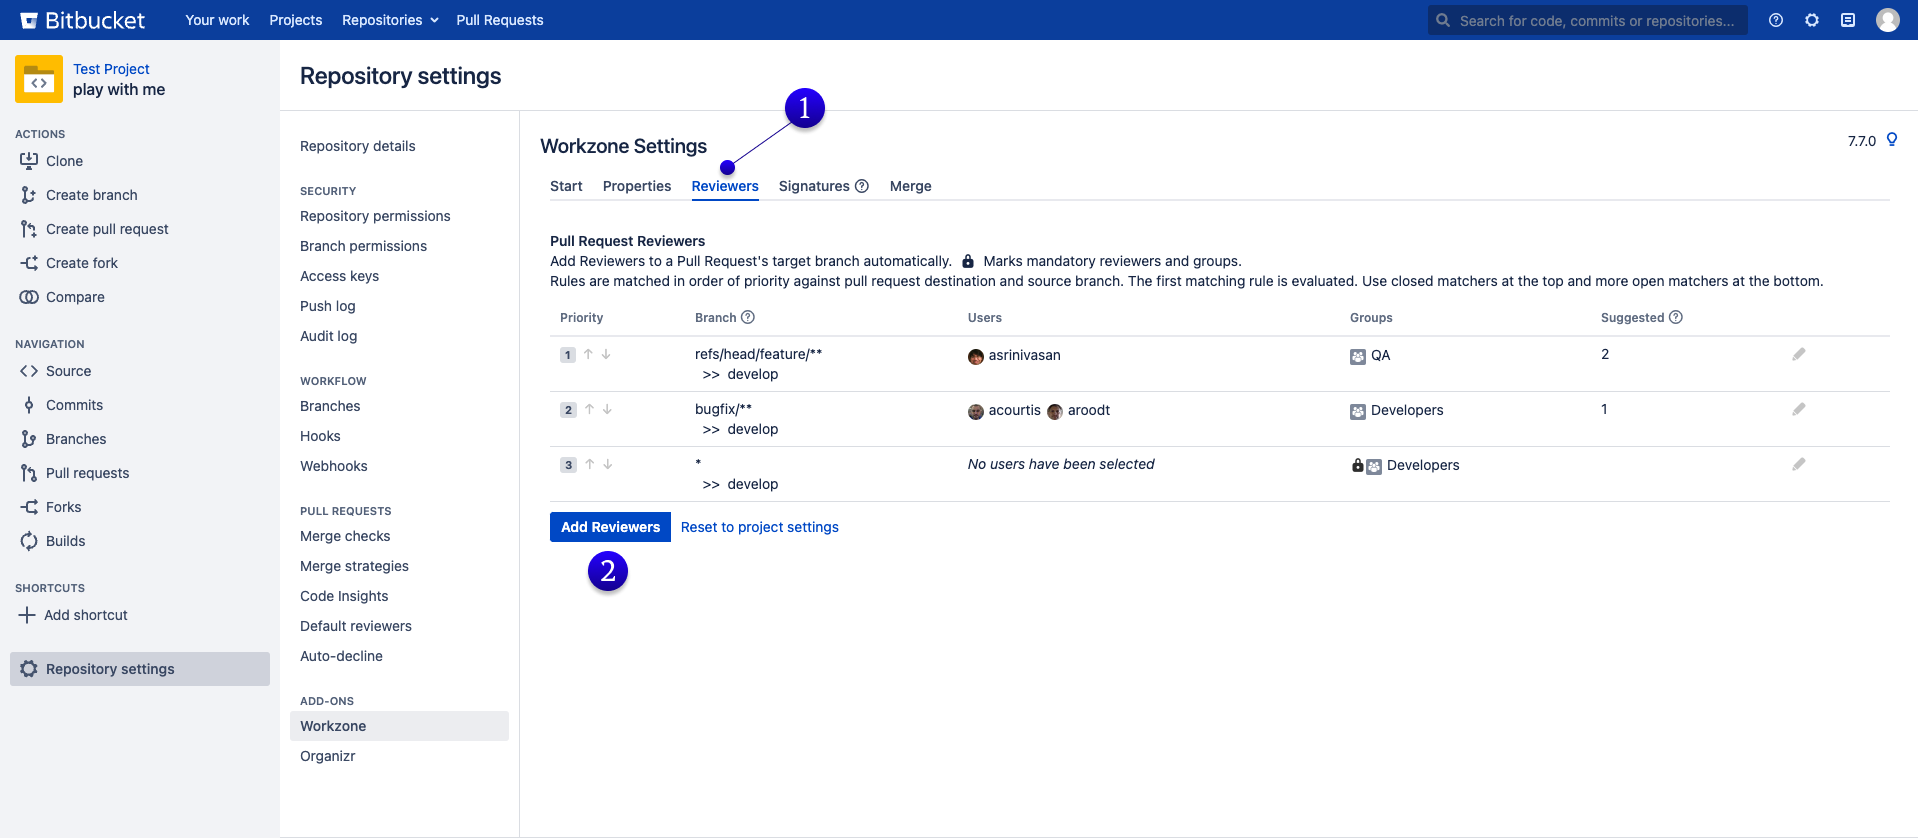
We will start by setting up which Pull Request reviewers will be added to which branch automatically. For this example, we will be focusing on a single repository, although this can be done on a project level as well which will be covered in more detail with the feature guide space. Start by navigating to Workzone settings within your repository.
- Navigate to the Workzone settings within your repository settings – Click on the “Reviewers” tab
- Followed by the “Add Reviewers” button.
Note: Disregard all the existing Pull Request Reviewers seen in the screenshot below – We have kept that in there for reference to show what the finished reviewers look like – You do not need to replicate them.
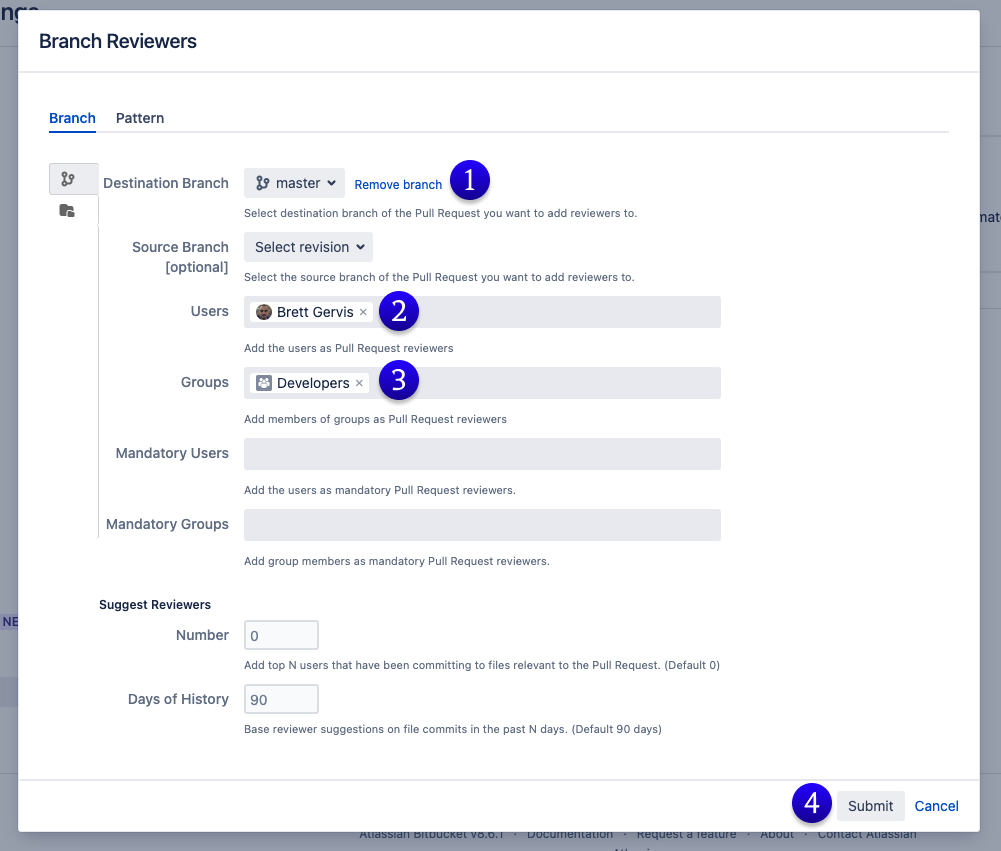
- Select a Destination Branch, e.g. “Master”
- Add in the relevant Pull Request “Reviewers” (users in this case), e.g. “Brett Gervis”
- Add members of groups as Pull Request reviewers, e.g. “Developers”
- Click “Submit”.
Then,
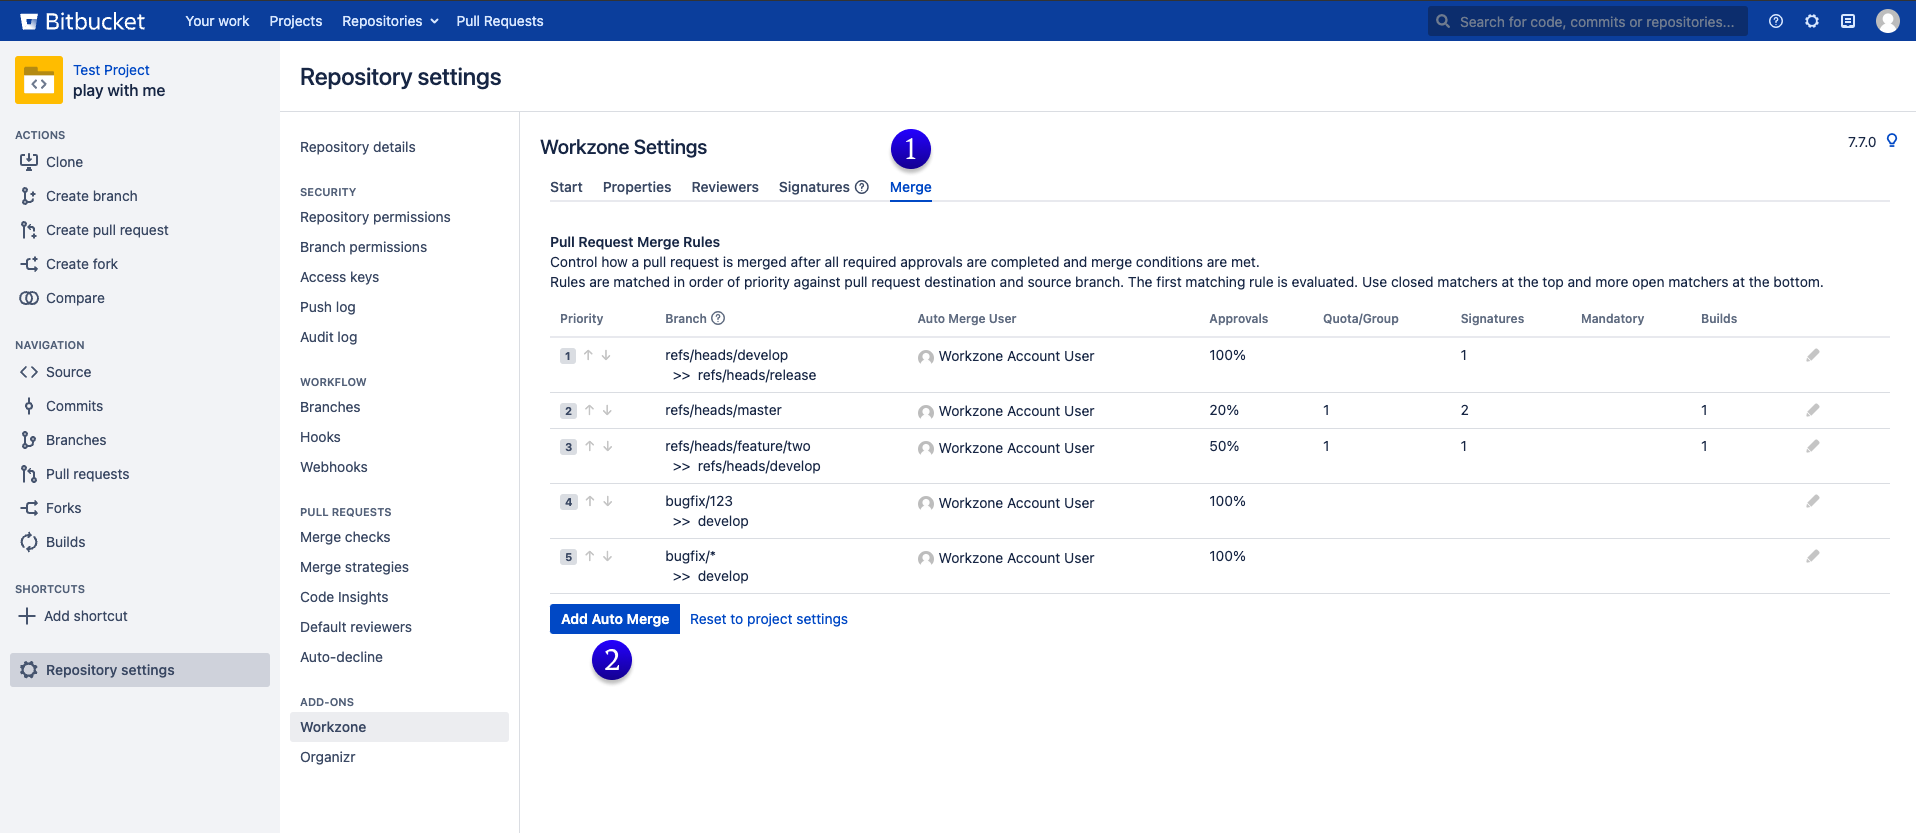
- Navigate to the “Merge” tab within the Workzone repository settings.
- Click on the “Add Auto Merge” button.
Note: Disregard all the existing Pull Request Merge Rules seen in the screenshot below – We have kept that in there for reference to show what the finished rules look like – You do not need to replicate them.
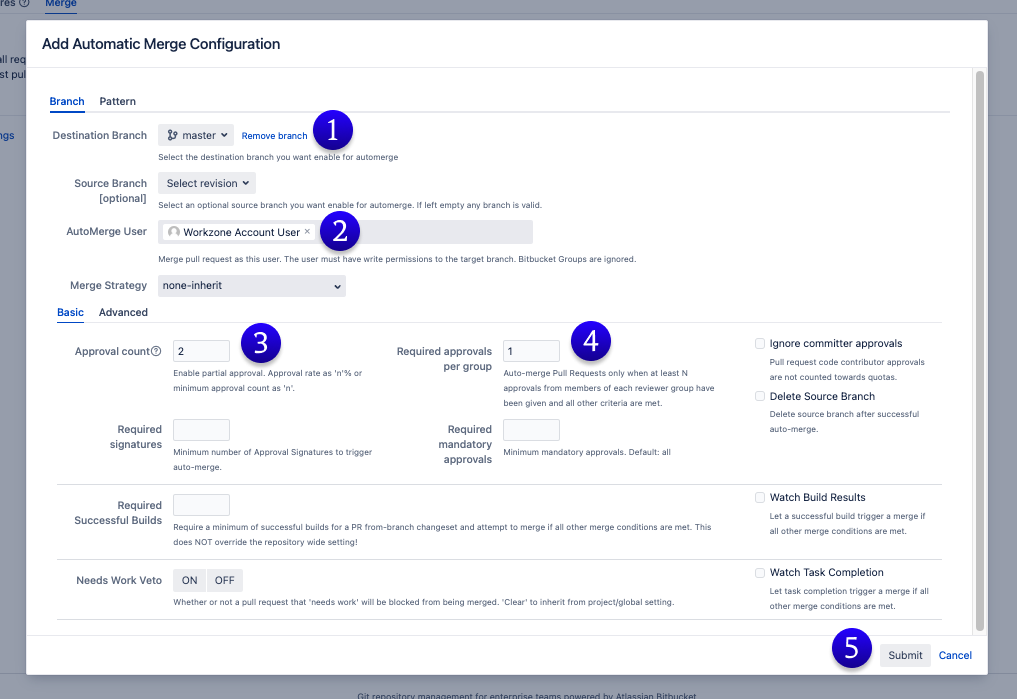
- Select a Destination Branch – This must be the same destination branch selected when creating “Reviewers”.
- Select “Automerge User” – Merge pull request as this user. This is where the new “Workzone Account User” is involved as mentioned in the steps above. You can also choose your own existing user, however they must have write permissions to the target branch.
- Change “Approval Rate” to 20% or the “Approval count” if you are using a number instead of a percentage, i.e. “2” – This is just a recommended figure to get started, this can be changed to your preference at a later stage.
- Change “Approvals/Group” to 1 – Again, this is just a recommended number, this can be changed to your preference later.
- Click “Submit”.
This completed our basic setup configuration. Let’s test it out.
Before we do, we recommend performing all tests in a new test repository or test project while you get comfortable using the tool.
Now that you have your test repo – with all the above settings configured – it’s time to create a pull request to the branch that has been chosen above – In this case “master” branch.
If you get stuck, please do not hesitate to reach out here.

