
Time to set up Workzone for Bitbucket Cloud!
Below is a simple step-by-step tutorial on basic settings configuration to help get you started. Once a basic setup has been implemented, we encourage you to read through all Workzone Features to assist with adding further complexity.
Using Workzone with Bitbucket Premium #
All workspaces signed up for Bitbucket Cloud Premium and using IP Allowlisting under Access Controls in the Bitbucket Workspace settings, will need to whitelist Workzone IPs to ensure correct functionality of Workzone. Please visit this FAQ page for instructions on how to add Workzone IP to your workspace IP allowlist.
Create Workzone account user and API Token #
Why should I create an account user? When Bitbucket apps such as Workzone carry out actions such as adding reviewers to pull requests or merging pull requests automatically the user that installed the Workzone app will be the initiator of these actions.
In the following steps you will
- Create and invite an account user (recommended) or use an existing user with administrative privileges to act on Workzone’s behalf.
- Set up an API-token for the account user in their Atlassian profile settings.
Note: These steps only need to be performed once at the initial setup. Other workspaces can re-use the Workzone account user.
Setting up the Workzone account user #
- Create an additional Workzone account email within your organisation
- (e.g. [email protected])
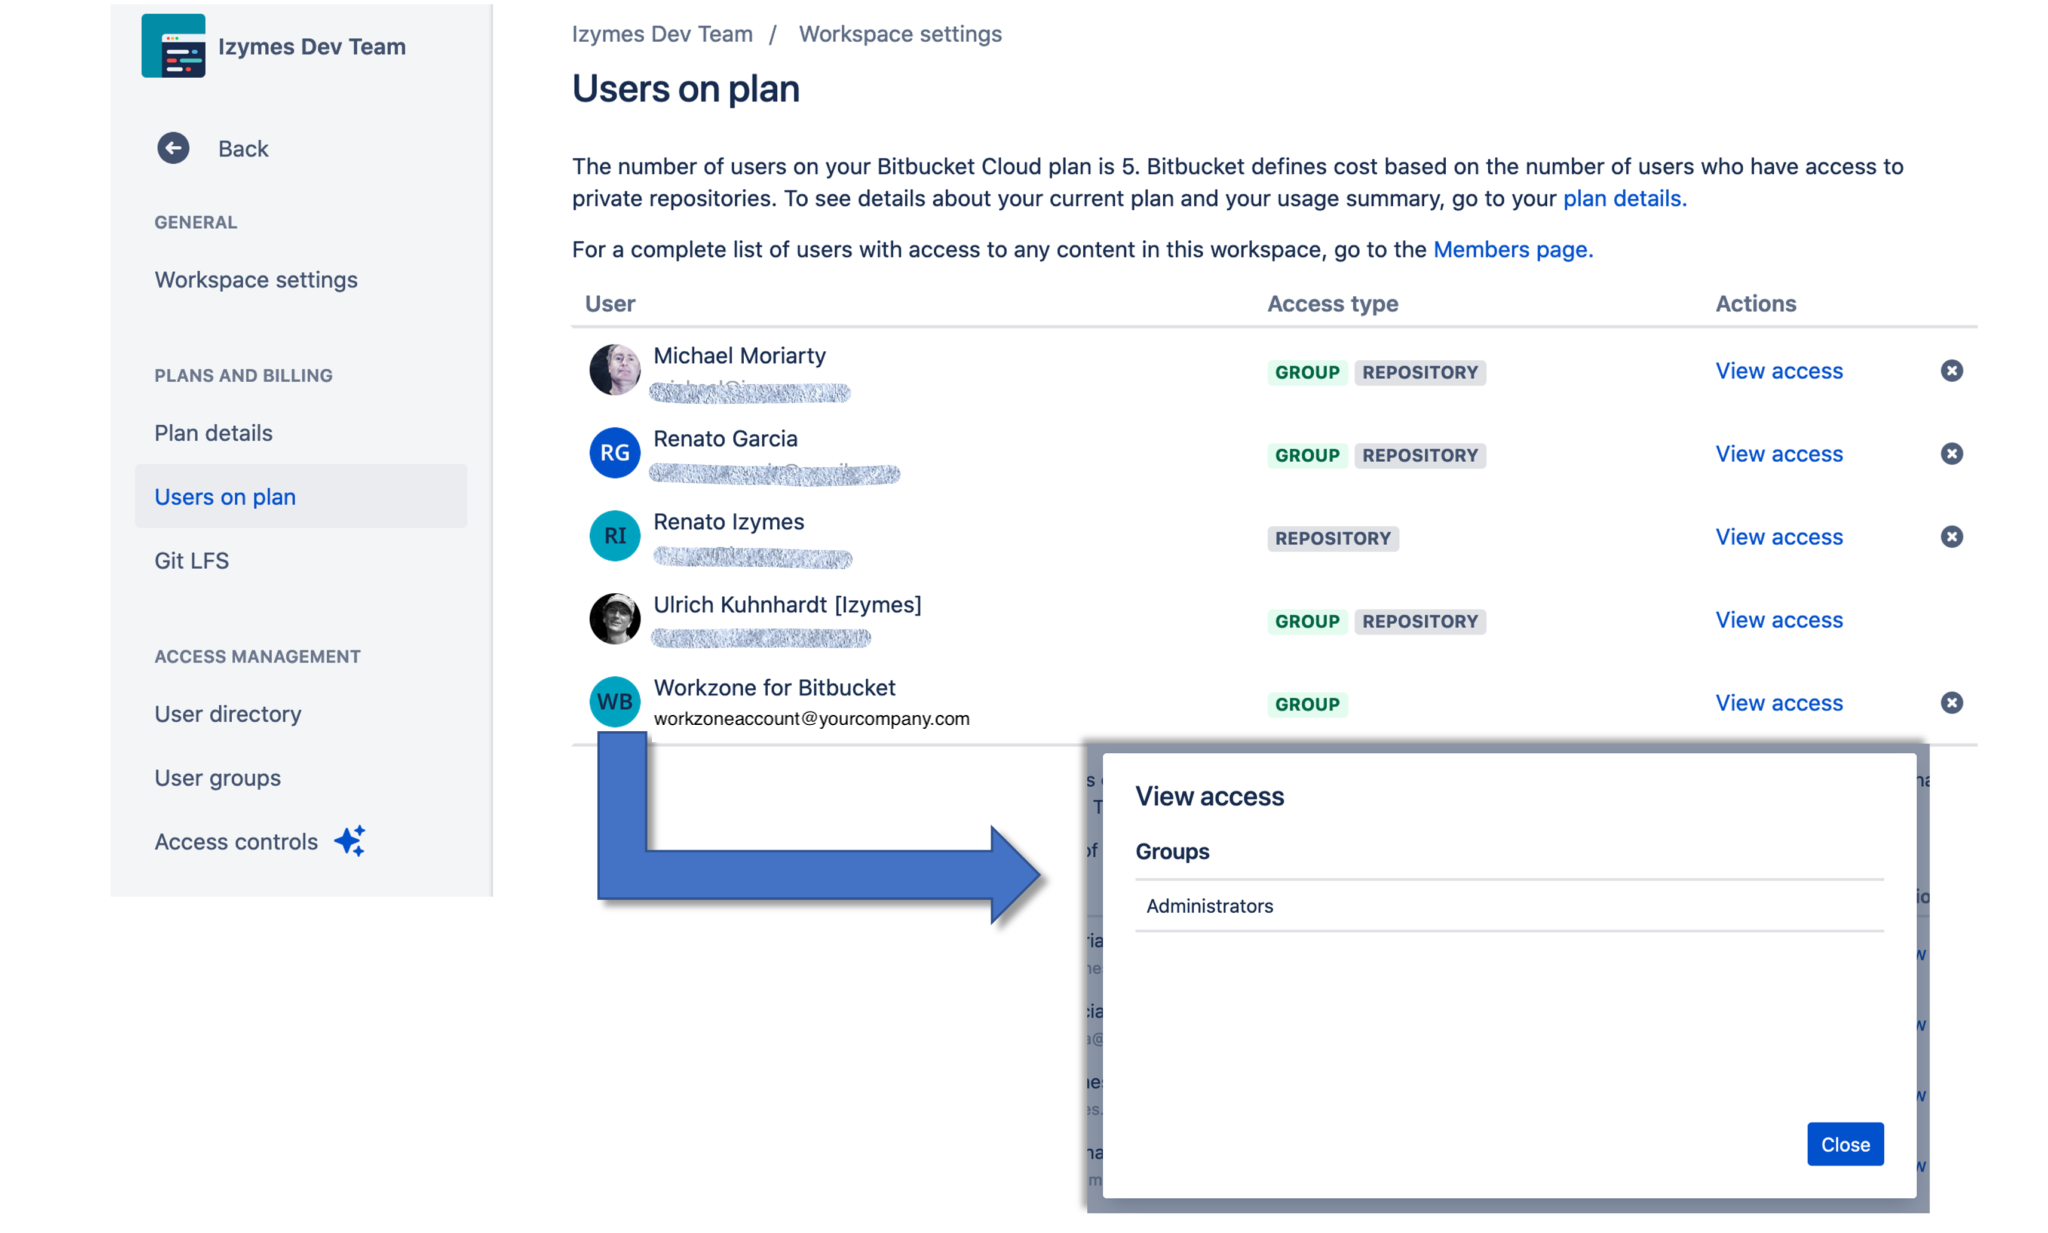
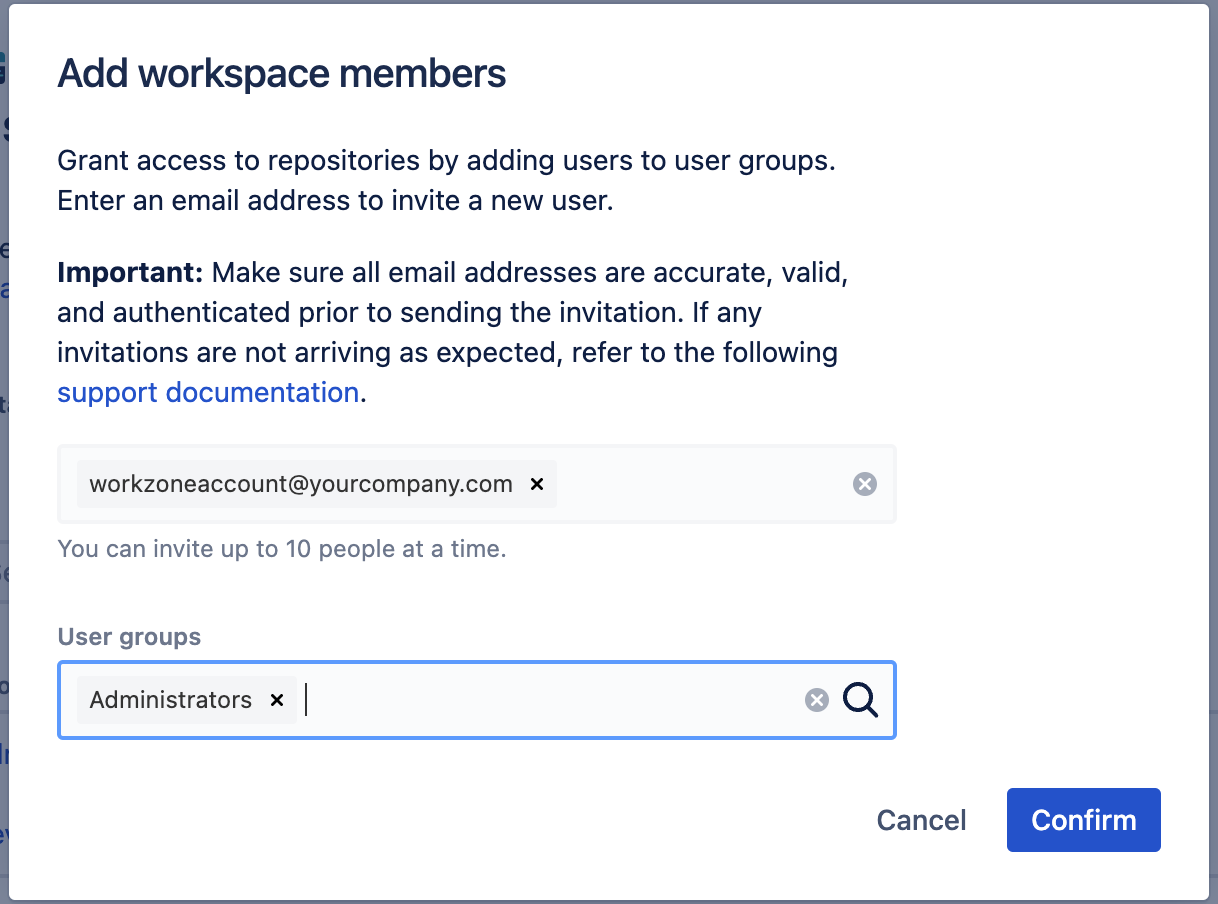
- Using the new Workzone account email, invite a new user in your workspace and assign admin permissions.
Access the invitation email and click on the invitation link. Join bitbucket.org and create the Workzone account including password.
Creating an API-Token for the Workzone Account user #
- Log in as the Workzone account user.
- In Settings, open “Atlassian Account Settings”.
- In “Atlassian Account Settings” open “Security” and locate “API Tokens” and click “Create and manage API tokens”.
- Click the “Create API token with scopes” button.
- Add “Workzone_API_Token” as the name.
- Select the latest possible expiration date, for example 365 days from creation date.
- Click “Next” and add the following scopes for app “Bitbucket”:
- READ scopes: read:account, read:me, read:permission:bitbucket, read:project:bitbucket, read:pullrequest:bitbucket, read:repository:bitbucket, read:user:bitbucket, read:workspace:bitbucket
- WRITE scopes: write:pullrequest:bitbucket, write:repository:bitbucket
- ADMIN scopes: admin:project:bitbucket, admin:repository:bitbucket, admin:workspace:bitbucket
- Click “Create token”.
- Note down the generated API Token – you need it in the next step.
- Click “Close”.
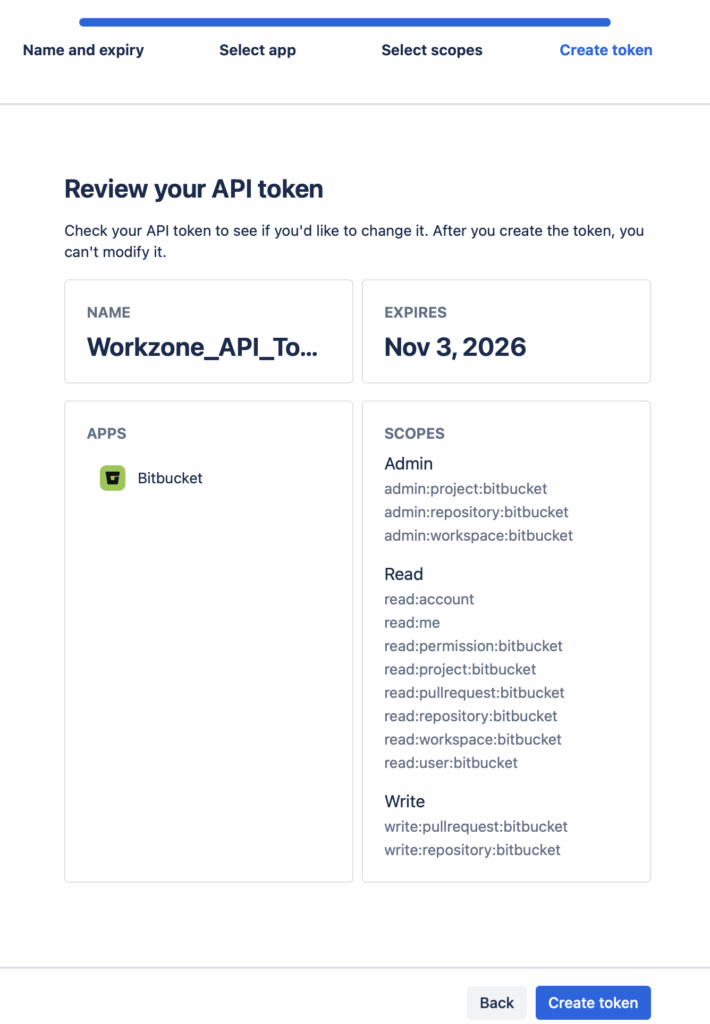
Bitbucket API Token and Scopes
You can now log back in to your own admin account and continue with the steps below.
Subscription Settings #
Teams consisting of up to 5 people can use Workzone Cloud with a free subscription. However, if your team currently consists of more than 5 people, a paid subscription will need to be activated after a 30 day trial.
To ensure maximum security and ease of configuration, we use Stripe for all Workzone Cloud subscription payments.
To activate a subscription, complete the following steps;
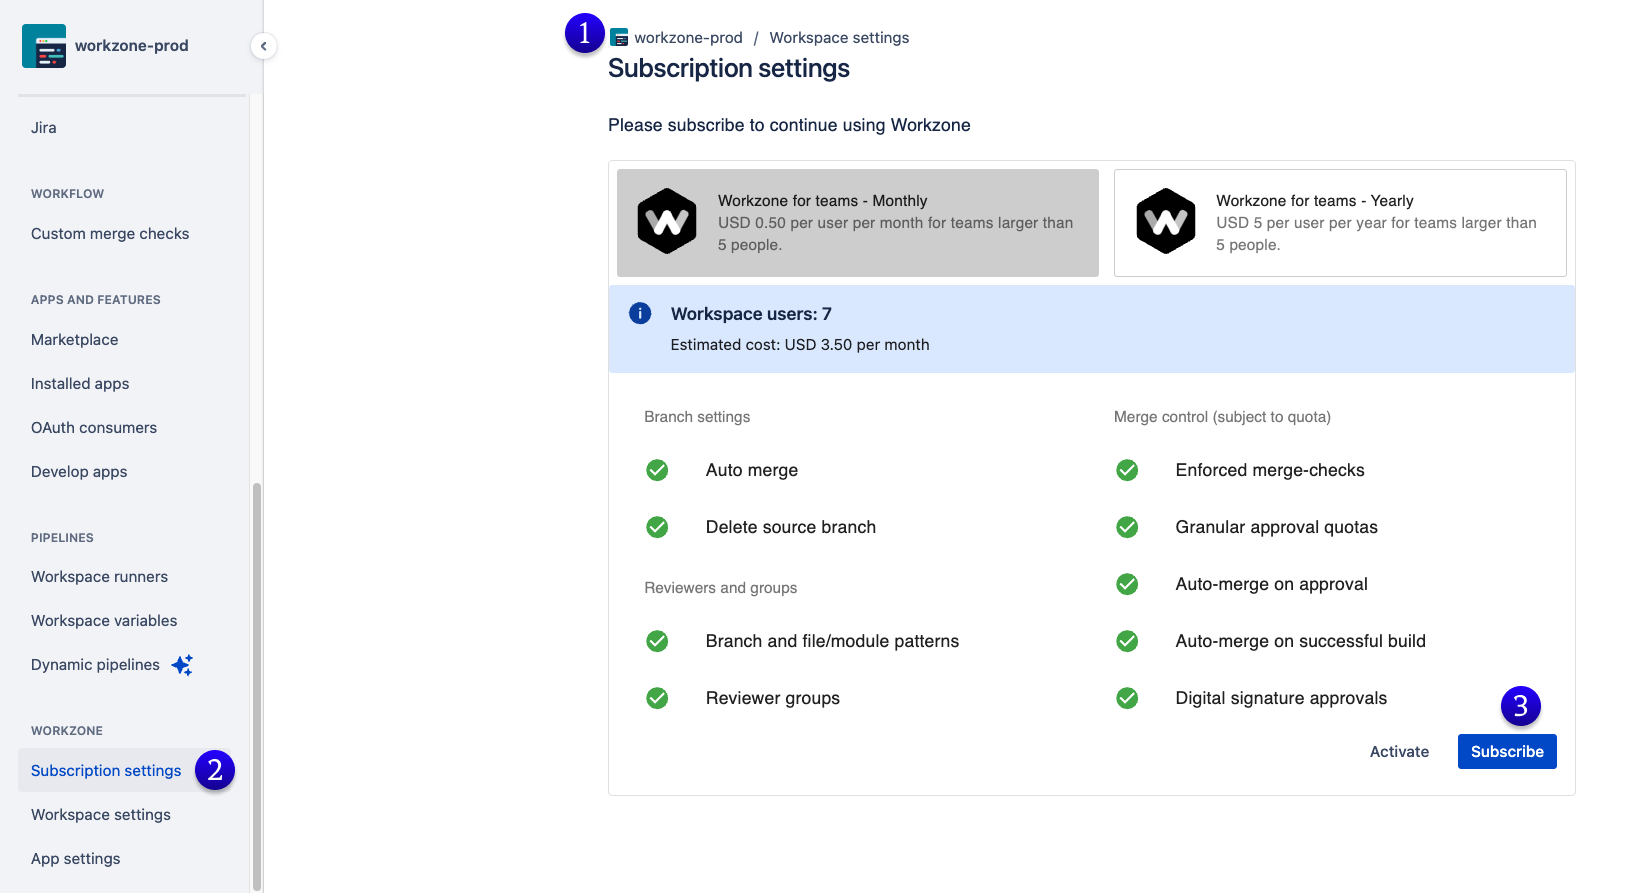
- Navigate to your Workspace Settings
- Scroll down the left menu to “Subscription Settings” under the “Workzone” title.
- On this screen, you can view your current workspace user count along with the estimated cost. Click “Subscribe” to open the Stripe payment process.
An invoice will be sent to the email address used during the Stripe Payment process. The email address used does not need to be the same as the Atlassian account email being used.
You can choose between a monthly or yearly billing option via the two tabs.
App Settings #
Performance parameters #
You can ignore these settings during setup and use the default values provided.
Credentials for Workzone #
Use Credentials for Workzone to save the Workzone account user name and API Token for Workzone you have created in step 1. Workzone needs to know the username and API Token to act on behalf of the account user. Note the API Token cannot be used to take over the account or compromise the account in any way and the API Token is stored encrypted.
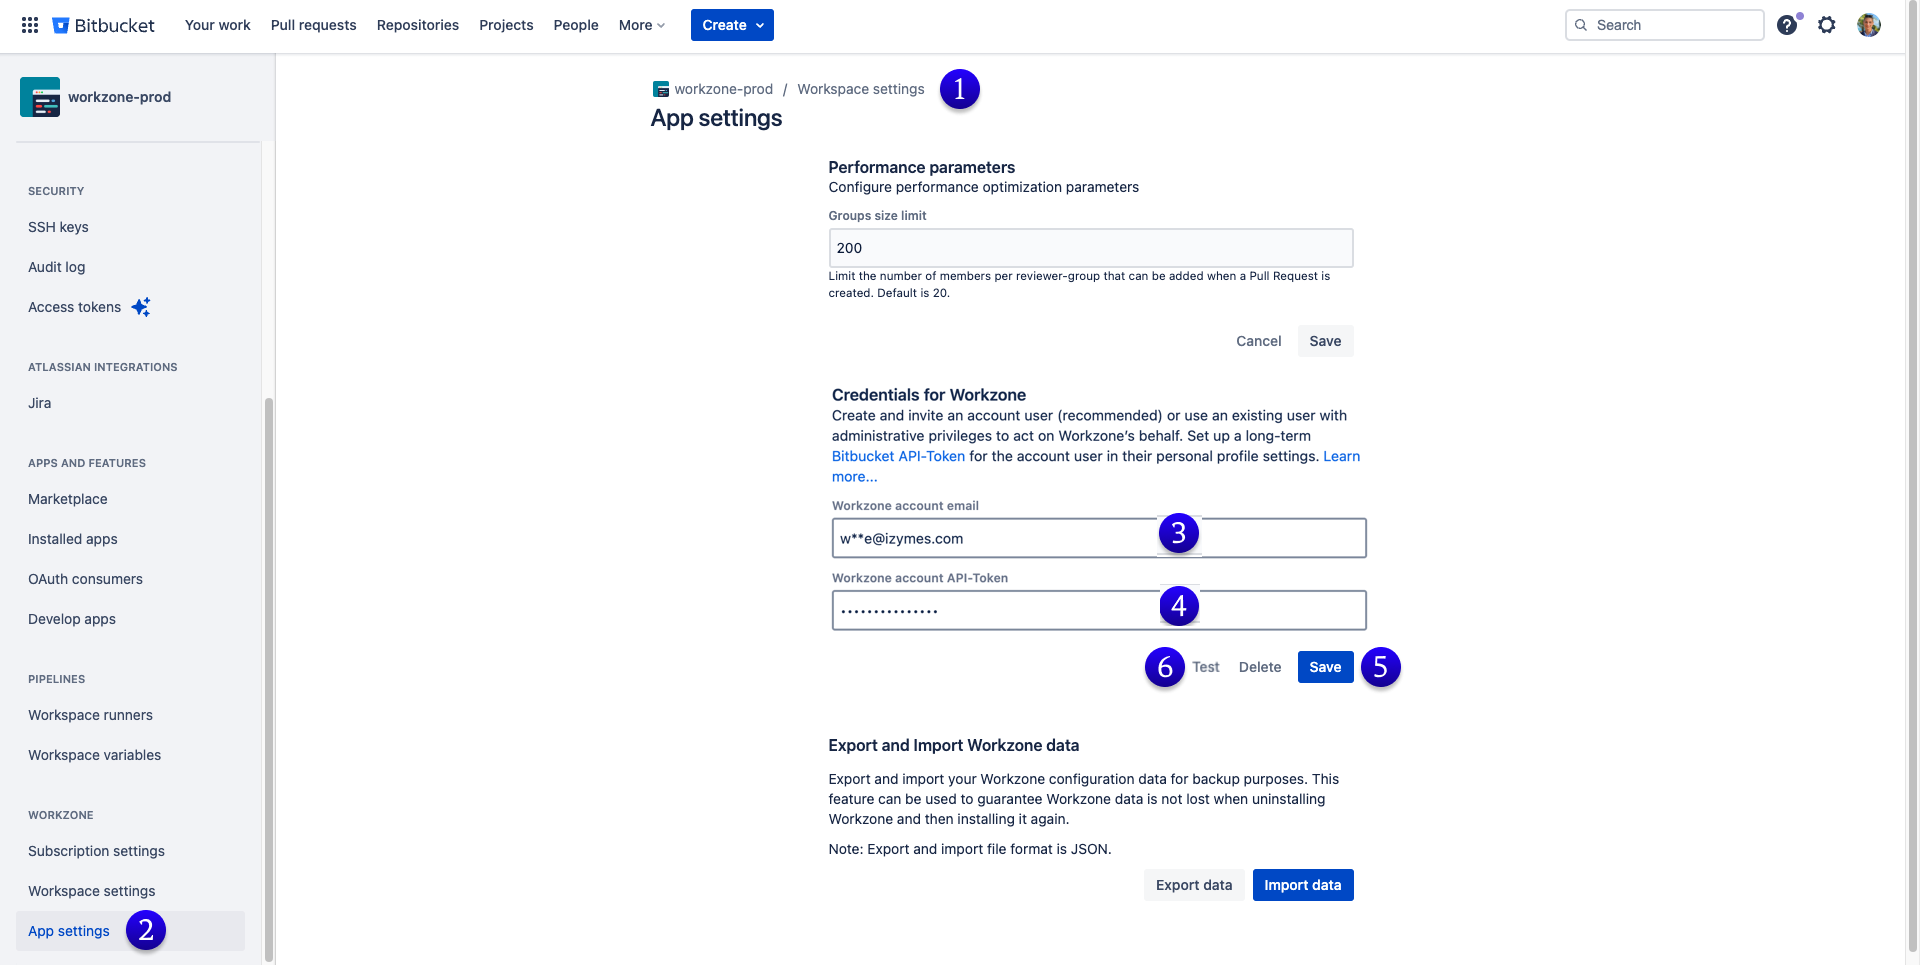
- In your admin account, navigate to your workspace settings.
- Scroll down to “App Settings” under Workzone in the left menu.
- Add in the new Workzone Account User email (not the username)
- Add in the Workzone Account API Token from the previous setup.
- Click “Save”.
- Click “Test” to confirm credentials entered are correct.
Repository branch restrictions settings #
In order for Workzone to control the pull request merge process and enforce the configured merge-conditions it is recommended to add repository branch restrictions for the same set of branches that have a Workzone reviewer and merge configuration in the workspace. This way only Workzone can merge pull requests when all conditions are met.
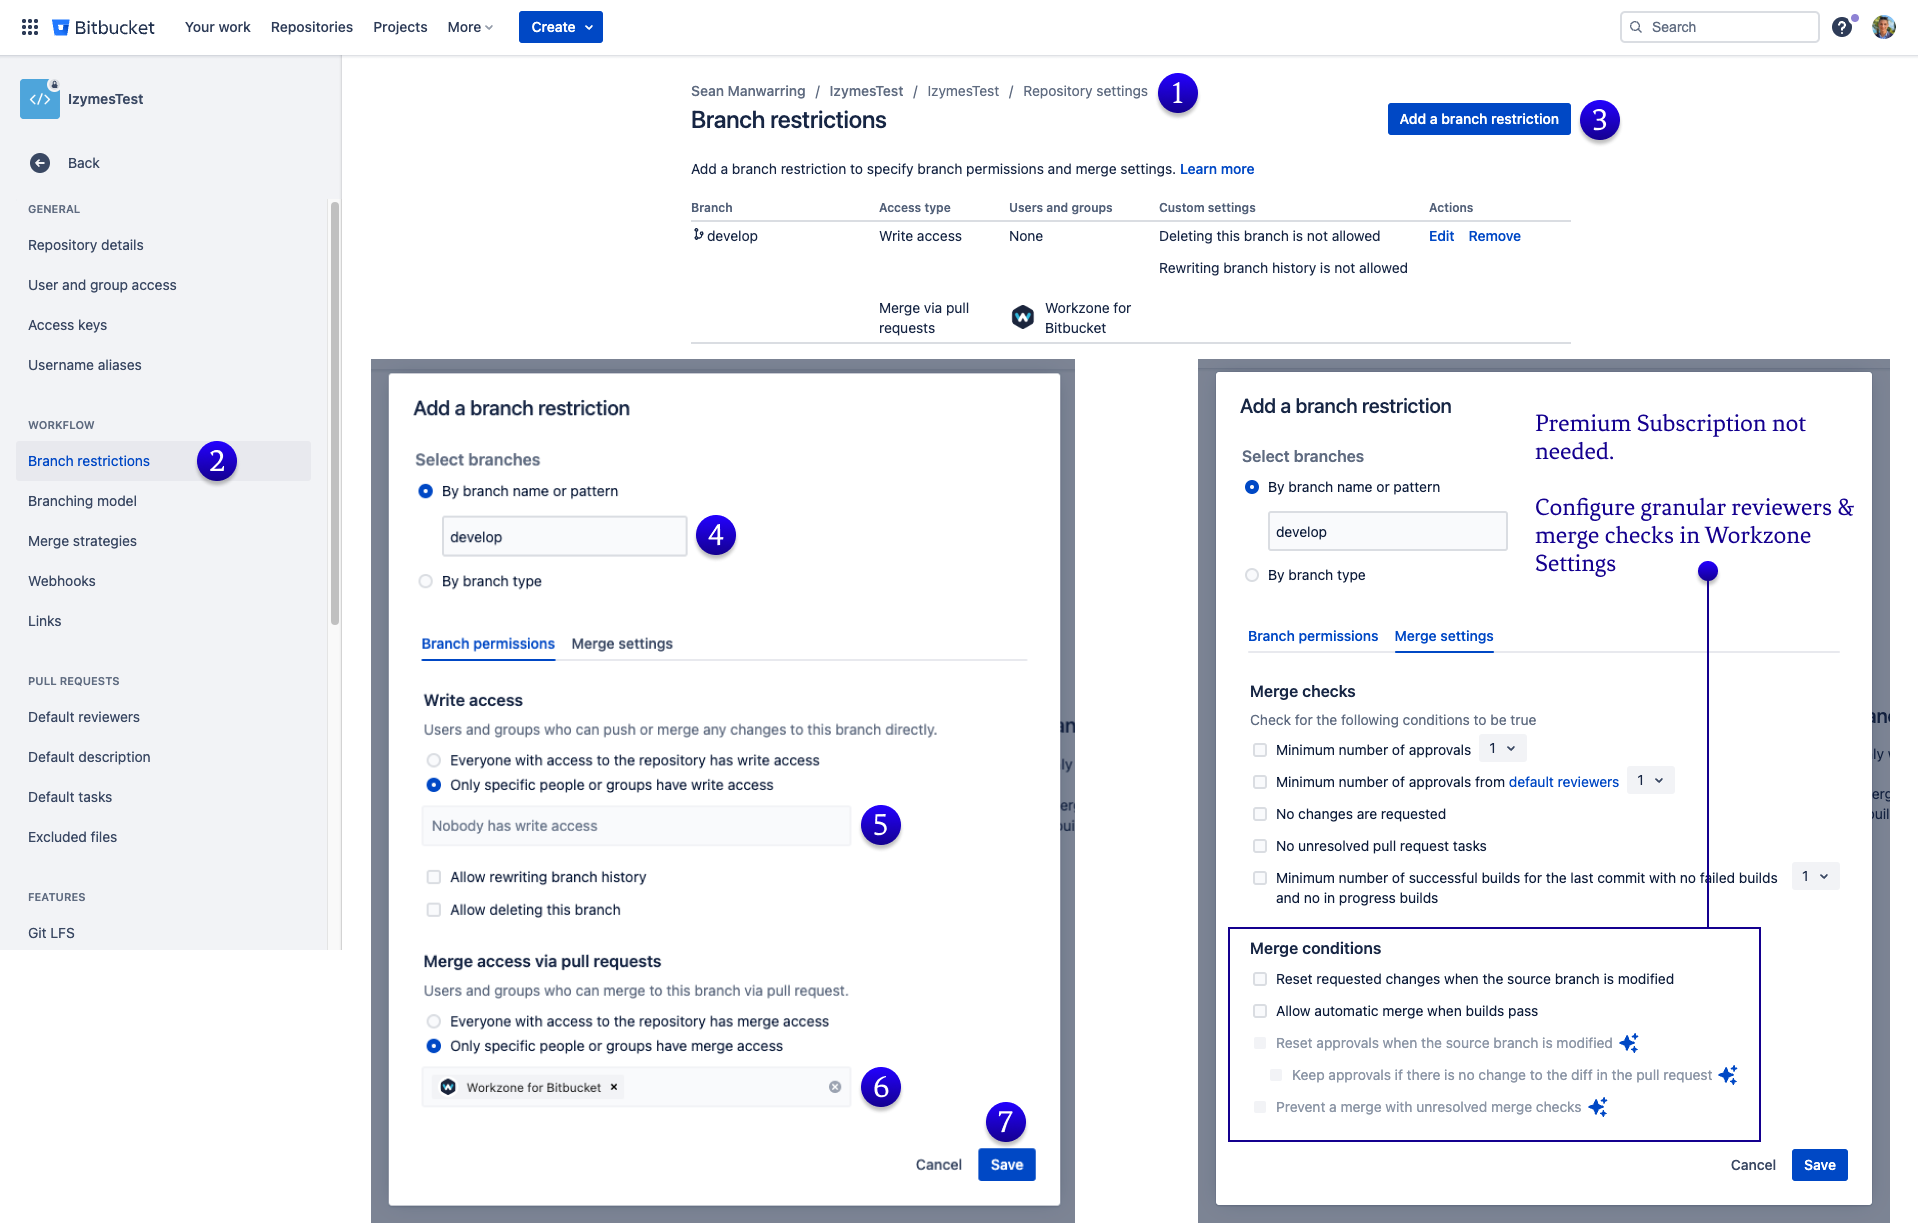
- Navigate to your Repository settings.
- On the left menu, open “Brand restrictions”.
- Click “add a branch restriction“.
- Add the same branch as used in the previous step, e.g. “develop“.
- Select “Only specific people or groups have write access”. Leave blank.
- Add in the Workzone account user set up from the earlier steps, e.g. “Workzone for Bitbucket”.
- Click “Save“.
Note: Bitbucket Premium is no longer needed when using Workzone for Bitbucket. You can configure granular reviewers & merge checks when in the Workzone Settings in the following steps.
Workzone Workspace Settings #
Pull request settings #
If configured Workzone will apply these settings to all pull requests in this workspace repositories when they are created. Configurations include:
- Pull request target branch
- Merge options
- Reviewers
- Approval quota
- File/module patterns
To get started, here is a basic setup configuration. The feature guides will break down in further detail each feature and functionality.
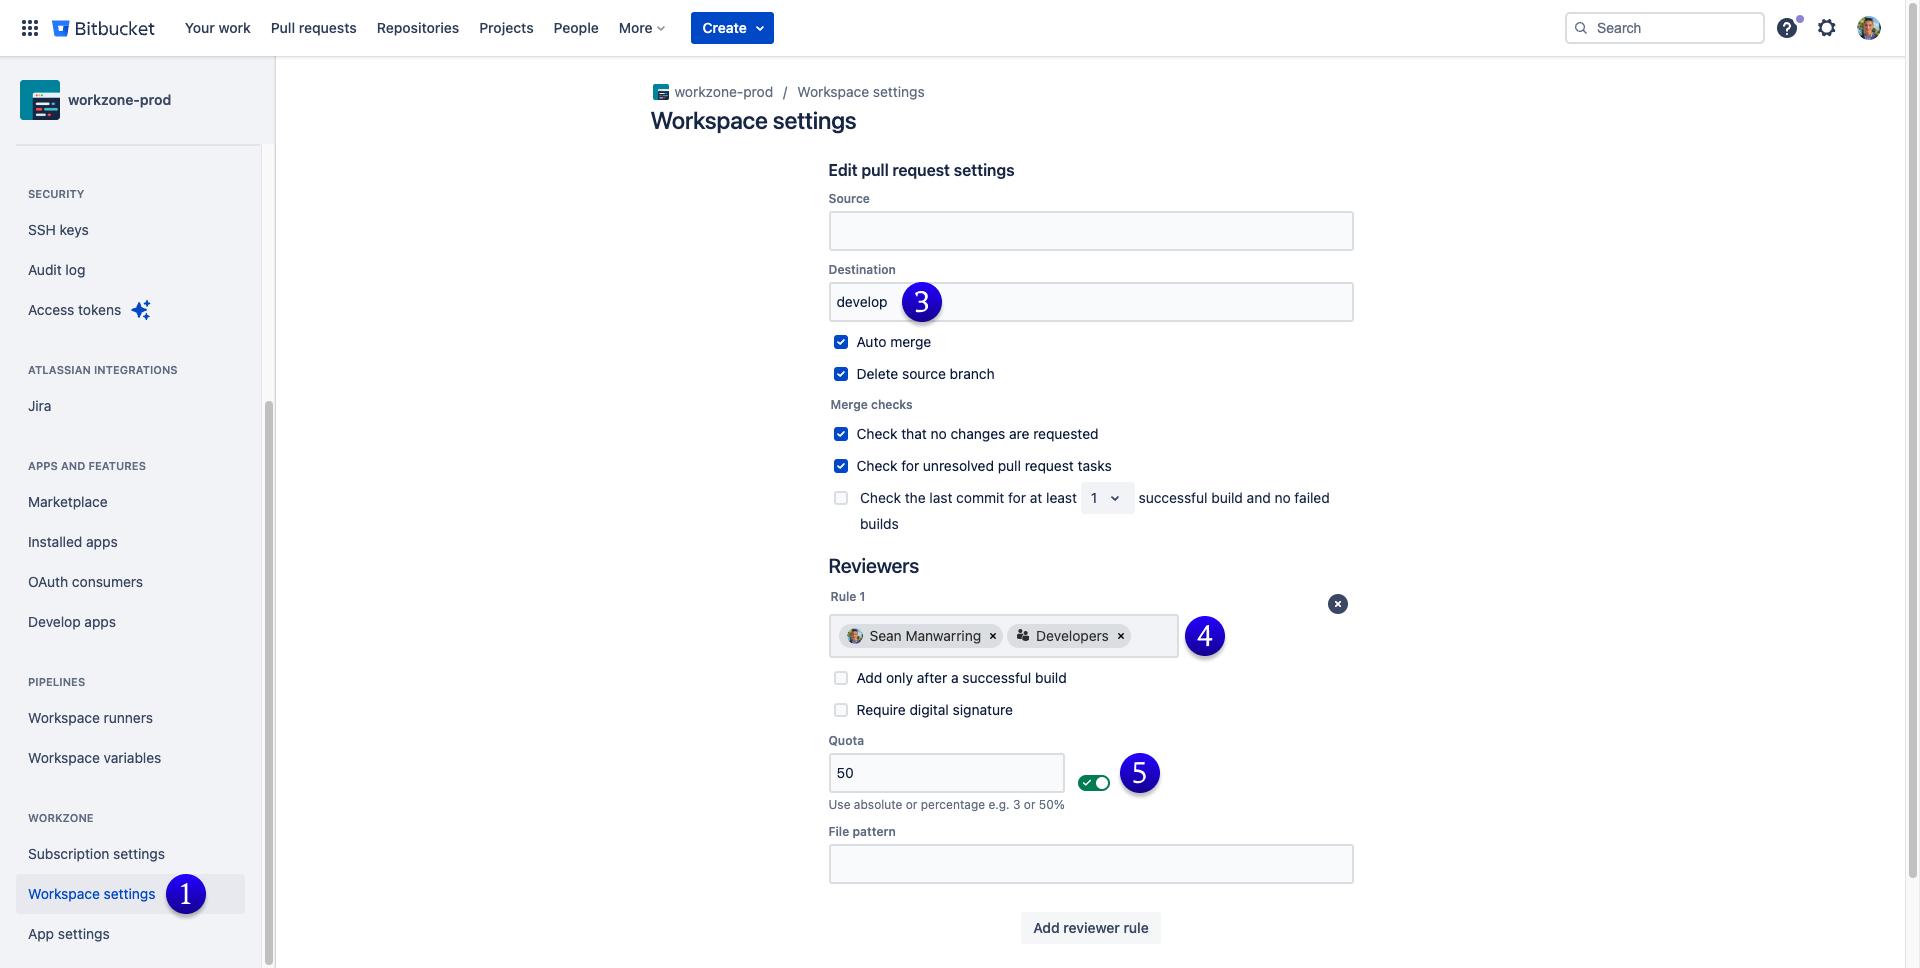
- Open the “Workspace settings” under Workzone located in your Workspace Settings menu.
- Click the “Add Setting” button.
- Add in the desired destination, e.g. “Develop”.
- Add in the desired reviewers, e.g. we have added “Sean Manwarring” as a reviewer along with “Developers” as a group of reviewers.
- Specify the a relative quota of how many approvals must be met, e.g. “50%”, or specify an absolute amount of approvals required.
- Optionally enter a file or path pattern to add reviewers conditionally if the pull request touches files that match the pattern.
- Click “Save”
- You may add more reviewer rules for different file paths or different reviewer groups and a corresponding required approval quota or count.
Workzone repository settings #
Important: Workzone Repository level settings will override the Workzone Workspace level settings. The following examples include screenshots within the Repository settings. If configured Workzone will apply these settings to all pull requests in the repository when they are created. Configurations include:
- Pull request target branch
- Merge options
- Reviewers
- Approval quota
- File/module patterns
Workzone repository settings override any workspace wide settings.

- Navigate to your Repository settings.
- Scroll down and open “Repository settings” in the Workzone section.
- Add in the desired Destination, e.g. “release”.
- Add in the desired Reviewers, e.g. “Developers”.
- Add in the desired Quota, e.g. “50%”.
- Add in the file pattern if required, e.g. “src/main/**”.
- Click “Save“.
Inherit Workzone settings from Project or Workspace Level #
You can choose to inherit your repository level settings from your project level settings, and then again inherit your project level settings from your workspace level settings.
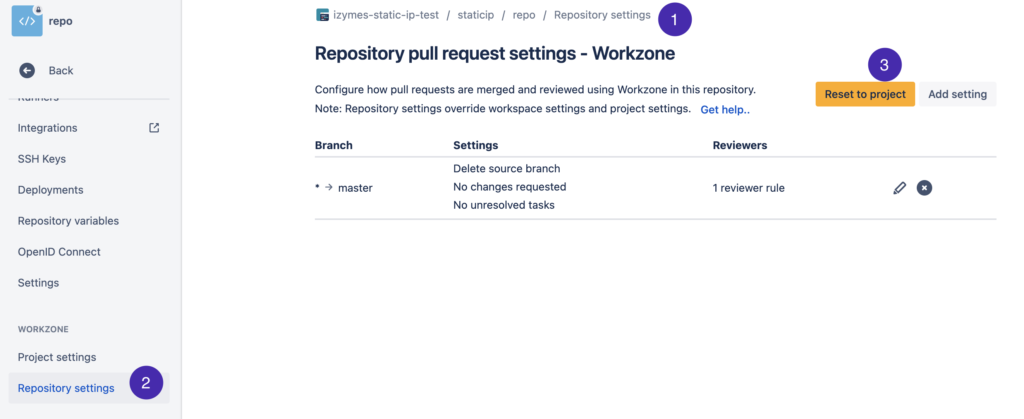
- Navigate to your repository settings
- Click on the “Repository settings” button in the Workzone section
- Click the “Reset to project” button.
If you need to decouple the repository settings from project settings, click the “Decouple from Project” button.
If you need to decouple the repository settings from workspace settings, click the “Decouple from Workspace” button.
It is important to note that only Project or Workspace admins have the ability to enable inheritance at repository or project level
- If Workzone is configured at workspace level, all repositories inherit the settings
- If Workzone is configured at workspace and project level, all repos under the project inherit project settings, all other repos inherit workspace settings
- If Workzone is configured at repository level, no other settings are inherited from project or workspace level
- Decouple projects from workspace to add project settings.
- Decouple repositories from project or workspace settings to add repo settings
- Reset project settings to workspace settings to inherit workspace settings for projects
- Reset repo settings to project or workspace settings to inherit the respective settings.
You’re all set up!
To learn more detail on the features and functionality, continue on with the feature guides below.