Alternatives to Git merge: Git’s Rebase and Cherry-pick
In our previous post, we covered how to use Git-merge and effective merge conflict resolution strategies to enable fast moving teams to collaborate effectively. Today, we’ll have a look at alternatives to git-merge, namely git-rebase and git-cherry-pick.
Alternatives to Git merge: Git’s Rebase and Cherry-pick
In addition to traditional branch merging, Git provides powerful commands like rebase and cherry-pick. These commands offer alternative strategies for integrating changes from one branch to another and provide opportunities to address conflicts in a different workflow. You can resolve conflicts and maintain a cleaner commit history by understanding and utilizing these commands effectively.
Understanding rebase and cherry-pick operations
Rebase is a Git command that allows you to move, combine, or modify commits on one branch and apply them on top of another branch. It rewrites the commit history, making it appear as if the changes were made directly on the target branch.
       A---B---C (Branch1)
      /
 D---E---F---G (Branch2)

Before Rebase:

       A---B---C (Branch1)
      /
 D---E---F---G (Branch2)

After Rebase:

       D---E---F---G---A---B---C (Branch1)
                   ^
                  (Branch2)
In this representation, we start with two branches: Branch1 and Branch2. After performing a rebase of Branch1 onto Branch2, the commits from Branch1 are moved on top of Branch2, resulting in a linear history. This makes it appear as if Branch1 was based on the latest commit of Branch2.
When performing a rebase, conflicts can occur when Git tries to apply the commits to the target branch.
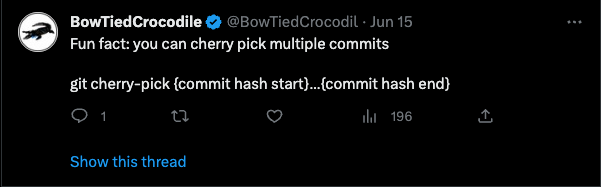
Cherry-pick is another Git command that allows you to select specific commits from one branch and apply them to another branch. It allows you to pick individual changes without merging entire branches.
       A---B---C---D (Branch1)
      /
 E---F---G (Branch2)

Cherry-Pick C:

       A---B---C---D (Branch1)
      /
 E---F---G---C' (Branch2)
In this representation, we have two branches: Branch1 and Branch2. We want to cherry-pick commit C from Branch1 onto Branch2. After the cherry-pick operation, a new commit C' is created on Branch2, which contains the changes from commit C of Branch1. The resulting history on Branch2 now includes the changes from commit C, as if it was originally made there.
Similar to rebase, conflicts may arise when cherry-picking commits that modify the same code sections.
Resolving conflicts during rebase and cherry-pick
When conflicts occur during a rebase or cherry-pick operation, Git will pause the process and prompt you to resolve the conflicts manually. The conflict resolution process is similar to the manual conflict resolution described in our last post, involving identifying conflicting sections, making necessary changes, and removing conflict markers.
To resolve conflicts during a rebase or cherry-pick:
- Git will notify you of the conflicting files and display the conflict markers in the affected files.
- Open each conflicting file in a text editor or IDE and manually modify the code to resolve the conflicts, following the same conflict resolution process as in traditional merge conflicts.
- After resolving the conflicts, save the modified file(s) and continue the rebase or cherry-pick operation by following Git’s instructions.
Ignoring Whitespace conflicts: some conflicts are only due to whitespace differences, evident when lines are removed on one side and added on the other. By default, Git treats these as changes, hindering automatic rebase or cherry-pick. Git’s default rebase strategy can handle whitespace with options like -Xignore-all-space (ignores all whitespace) or -Xignore-space-change (treats whitespace sequences as equivalent) if you encounter many whitespace issues during rebase or cherry-pick.
Benefits and considerations of using these techniques
Using rebase and cherry-pick for conflict resolution offers several benefits:
- Commit history clarity: Rebase and cherry-pick operations allow you to maintain a linear commit history by integrating changes from one branch to another without creating merge commits. This can result in a cleaner and more straightforward commit history.
- Focused changes: Cherry-pick enables you to select and apply specific commits, allowing for more granular control over which changes are integrated. It can be useful when you only want to pick specific features or bug fixes from one branch to another.
However, it’s important to consider the following points:
- Potential for conflicts: Both rebase and cherry-pick operations can introduce conflicts, especially when dealing with complex code changes or when multiple branches modify the same code sections. Be prepared to handle conflicts effectively during the process.
- Impacted commit history: Rewriting commit history with rebase or cherry-pick can impact other collaborators who have based their work on the original commits. Communicating and coordinating with teammates is crucial to minimize disruptions and ensure a smooth integration process.
By leveraging Git’s rebase and cherry-pick operations, you can adopt alternative strategies for conflict resolution and maintain a cleaner commit history while integrating changes across branches. Use these techniques judiciously based on your project’s requirements and collaborate effectively with your team to mitigate any potential challenges.
Using Git Hooks for Automated Conflict Resolution
Git hooks are scripts that Git executes at specific points during its workflow. By leveraging Git hooks, you can automate certain conflict resolution tasks and streamline the process. Hooks can be used to automatically merge or resolve conflicts based on predefined rules, reducing manual intervention and ensuring consistent conflict resolution across your development workflow.
Preparing a custom Git hook
To implement automated conflict resolution using Git hooks, follow these steps:
- Navigate to the .git/hooks directory in your Git repository. This directory contains various sample hook scripts.
- Choose the appropriate hook script to modify or create a new hook file, such as pre-commit, pre-rebase, or pre-merge-commit. These hooks are executed at different stages of Git’s workflow, allowing you to intervene before committing, rebasing, or merging.
- Open the selected hook script in a text editor and add the necessary logic to handle conflict resolution. You can use scripting languages like Bash, Python, or Ruby to write the hook script.
Implementing conflict resolution logic in the hook
Within the hook script, you can include conflict resolution logic that automatically resolves conflicts based on predefined rules. Some possible approaches include:
- Accepting specific branch changes: You can configure the hook to automatically accept changes from a specific branch when conflicts occur. For example, this approach can be useful when merging a feature branch into a main branch.
- Triggering an interactive merge tool: The hook can be designed to launch an interactive merge tool automatically when conflicts are encountered. This allows developers to resolve conflicts visually within the tool, providing a streamlined and consistent conflict-resolution experience.
Testing and configuring the Git hook
After implementing the conflict resolution logic in the hook script, it’s essential to test it thoroughly. Create test cases that simulate conflicts and verify that the hook automatically performs the desired conflict resolution.
To enable the Git hook, make sure the hook script is executable. If you created a new hook, remove the .sample extension from the filename. Git will execute the hook script at the appropriate stage during its workflow.
Benefits and considerations of using Git hooks
Using Git hooks for automated conflict resolution offers several benefits:
- Consistency and efficiency: Automated conflict resolution ensures that conflicts are resolved consistently and according to predefined rules. This can save time and reduce the likelihood of human error during conflict resolution.
- Enforced best practices: Hooks allow you to enforce specific conflict resolution strategies or coding standards across your team or organization. This promotes adherence to best practices and maintains code quality.
- Integration with CI/CD pipelines: Git hooks can be integrated into continuous integration and delivery (CI/CD) pipelines, ensuring conflicts are resolved automatically before code is built, tested, and deployed.
However, keep the following considerations in mind:
- Complexity of hook logic: Designing effective conflict resolution logic within hooks can be challenging, especially for complex scenarios or projects with diverse branching strategies. Ensure that the hook’s logic covers the majority of conflict cases and consider incorporating fallback mechanisms for exceptional cases.
- Communication and collaboration: Automated conflict resolution should be well-documented and communicated within the development team to avoid confusion. Establishing guidelines and ensuring all team members are aware of the conflict resolution approach implemented through hooks is crucial.
By leveraging Git hooks, you can automate conflict resolution tasks and enforce consistent resolution strategies across your team or organization. These hooks can significantly streamline your development workflow, reduce manual effort, and enhance code quality through automated conflict resolution.
Next: Collaborative Conflict Resolution Workflows with Git
Visit our last article: Advanced Git merge conflict resolution techniques
Until then, happy coding everyone!
Sean Manwarring
If you enjoyed this article and want to read more like it, visit our blog space 📰
Visit our flagship app Workzone – Automate and control your Pull Request Workflow, Reviewers, Compliance, Approvals and Merge Process.